How to add and configure the Registration wizard
The Registration wizard determines the registration procedure for new clients in the B2Core UI, as well as the information the clients are prompted to provide during registration.
You can add several Registration wizards in order to configure separate registration procedures, for example, for individual and corporate clients.
To add and configure the Registration wizard:
Navigate to System > Wizards.
On the Wizards page, click +Create in the upper-right page corner.
On the Create wizard page, fill in the following fields:
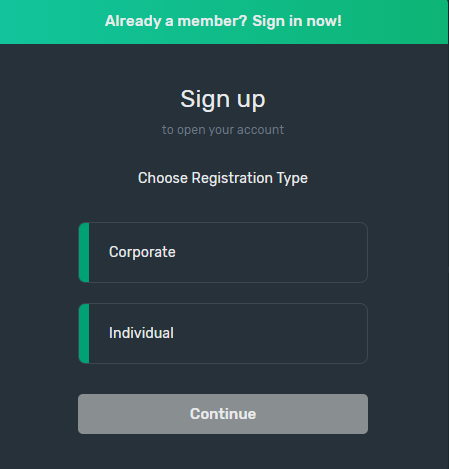
In the Name field, enter the wizard name, such as Corporate or Individual. The wizard name is displayed to clients as the name of the registration option on the Sign up page in the B2Core UI.
In the Type dropdown, select Registration.
In the Default dropdown, select:
Yes — to mark the wizard as the default Registration wizard. The default wizard is displayed as the first registration option on the Sign up page in the B2Core UI if more than one Registration wizard is configured.
No — to display the wizard following the default one on the Sign up page in the B2Core UI if more than one Registration wizard is configured.
Click Save to add the wizard.
In a wizards list, find the added Registration wizards, and click Edit.
In the Description field on the Wizard tab, optionally enter a short description of the registration procedure or any other helpful information that clients should know before they start registration. The description is displayed under the wizard name on the Sign up page in the B2Core UI.
To configure the registration procedure steps, go to the Workflow tab.
By default, the following three steps are configured and placed in the order in which they are performed during registration:
Step 1: Captcha Check — a client is prompted to pass a CAPTCHA test. Only Google ReCaptcha is supported.
The step is required and can’t be removed from the workflow, but you can choose to enable or disable the use of ReCaptcha on the Sing Up page (for details, refer to How to enable or disable Google ReCaptcha).
Step 2: Basic Information — a client is prompted to fill in the required personal information, such as an email address, first and last names, phone number, address, and password for accessing their profile in the B2Core UI.
To view a list of predefined fields added for the Basic Information step, click the Edit button located in the step row, and go to the Custom fields tab. Enable the fields that you want clients to fill in during registration and disable the others. You can also change the oder in which the fields are displayed on the Sign Up page (for details, refer to How to set up fields for the Basic Information step).
Step 3: User Registration — a client is registered in B2Core and assigned the client type and initial verification level (for details, refer to How to configure the User Registration step).
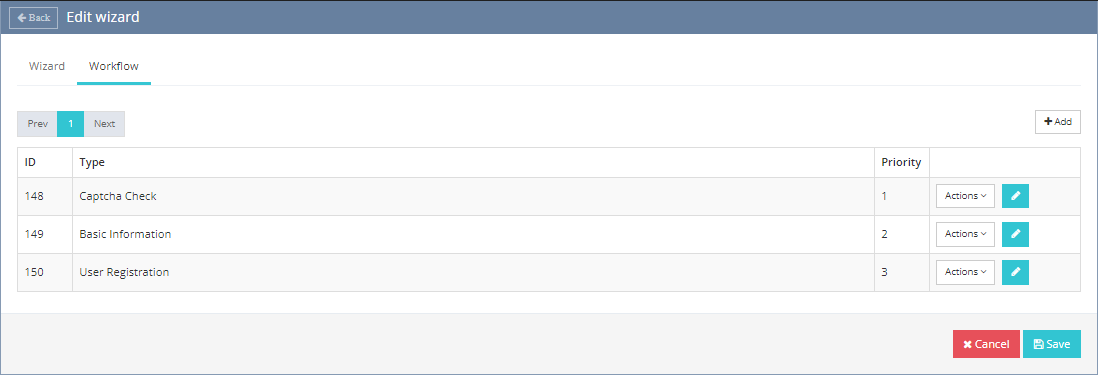
To include additional steps in the registration procedure, click +Add.
In the Add workflow popup, select the step type. The possible steps:
Client Type — a client is prompted to select the profile type, such as individual or corporate.
Email Confirmation — a client is prompted to confirm the email address entered at the Basic Information step with a verification code sent to that email.
New Phone Confirmation — a client is prompted to confirm the phone number entered at the Basic Information step with a verification code sent to that number.
Advanced — a client is prompted to provide extra information (for details, refer to How to set up fields for the Advanced step).
Click Save to add the selected step to the registration procedure. The step is added to the steps list based on the order that is predefined for each step.
After completing the configuration of the registration procedure steps, go to the Wizard tab.
On the Wizard tab, enable the wizard by selecting Yes in the Enabled dropdown.
Click Save to apply the changes.
After enabling the wizard, the corresponding registration option is displayed to clients on the Sign up page in the B2Core UI.
The image below shows an example of the the B2Core UI Sign up page enabling new clients to select the Individual or Corporate registration option.